Getting Started
Install Aura, sign in, choose how you want to begin, and make one small result you can verify.
Installation
Download the Aura AI installer for your platform from the links below. The Hub is a background application — it runs silently and powers all editor plugins through a local API.
- Run the installer and follow the prompts.
- Launch Aura AI — it will appear in your system tray.
- Sign in when prompted (Google, GitHub, or email) to activate your account.
- Choose Build inside Aura, Start a new game in an engine, or Connect an existing project.
Choose Your Starting Path
- Build inside Aura: start from an ordinary-language idea, review a bounded first-playable design, then play and revise the result in Aura. Open the tutorial.
- Start a new game in an engine: choose an installed Unity, Godot, or Unreal editor, review the location and starting scope, then approve project creation. Choose an engine tutorial.
- Connect an existing project: select your current game, confirm when context is live and supported actions are ready, then ask a safe question before requesting changes. Choose a connection tutorial.
Open the written starting-path guide. It includes the reviewed silent walkthrough captured from the installed Aura experience.
System Requirements
Before installing, verify that your development environment meets the minimum version requirements for each component you plan to use.
Operating System
| Platform | Minimum Version | Notes |
|---|---|---|
| 🪟 Windows | Windows 10 (64-bit) | Windows 11 recommended |
| 🍎 macOS | macOS 12 Monterey | Installer coming soon; Windows installer is available now |
Game Engines
| Engine | Minimum Version | Notes |
|---|---|---|
| 🎮 Unity | Unity 2020.3 LTS | Any subscription tier. Unity 6 fully supported. |
| 🤖 Godot | Godot 4.2 | Godot 3 is not supported. GDScript and C# (.NET) builds both work. Latest stable (4.x) recommended. |
| ⚙️ Unreal Engine | UE 4.26 | UE 5.x fully supported. Requires a C++ project (Blueprint-only projects must add a C++ class first to compile the plugin). |
IDE Extensions (optional)
| Editor | Minimum Version | Notes |
|---|---|---|
| 🟦 VS Code | 1.75 | Installed automatically by Aura AI; no marketplace visit required. |
| 🪟 Visual Studio | Visual Studio 2022 | Community, Professional, and Enterprise editions all supported. |
| 🧠 JetBrains Rider | Rider 2023.1 | Installed automatically by Aura AI when Rider is detected. |
Ask a Safe First Question
For an existing project, wait until Aura shows the project context as live. Begin with a question that does not request a change, for example:
Aura can use the indexed GDD passages, current file, selection, project structure, and editor state available for that workflow. Confirm that the answer names relevant project details and proposes no actions before you ask for a change.
Unity Integration
Installing the Plugin
The Unity plugin is bundled with the Aura AI installer and is installed automatically on first launch. Open your Unity project after installing Aura AI; the Aura AI menu item appears in the Unity menu bar when the plugin is ready. No package URL, marketplace download, or separate import is required.
The Aura Panel
Open the Aura panel via Window → Aura AI in the Unity menu bar. The panel docks like any native Unity window. It is also accessible from the ✦ Aura AI button in the Scene View overlay toolbar.
The panel is the single interface for all Aura features — chat, scene automation, code search, design documents, and settings.
Chat & Reviewed Actions
Aura uses one chat for questions, planning, debugging, and project-changing requests. You do not switch between Ask, Agent, or Plan modes.
- Questions and planning stay ordinary chat messages and do not change the project.
- Project changes appear as reviewed actions in the conversation. Check the proposed work, then approve or reject it.
- Play Mode safety blocks scene-changing actions while the Unity scene is running.
You can keep chatting at any time; there is no separate mode to exit or save.
Loops
A Loop is a bounded multi-step goal that lives in the same conversation. Aura may suggest one when a request needs repeated work and verification, or you can create one yourself with the Loop button or /loop.
- Describe the finished result and completion condition in chat.
- Review the compact Start a Loop? card, including the selected project and whether it runs on this computer or continues in the cloud.
- Start the Loop. Aura shows progress in chat and asks for approval before project-changing actions.
- Use the chat-native pause, resume, or stop controls whenever you need them.
- The Loop completes only after its goal is verified, a real blocker is reached, or a configured limit is hit.
Unity Cloud Loops: setup without surprise charges
You do not need Unity Build Automation for Local Loops. Connect it only if you want Unity validation while your computer and Unity Editor are off. Aura's Check Connection action is read-only: it does not start a build or consume Unity build minutes.
- Prepare source control. Connect the Unity project to a GitHub repository available to both Aura and Unity Build Automation. Confirm that
ProjectSettings/ProjectVersion.txtexists and that generated folders such asLibrary,Temp,Logs, andBuildsare ignored. Aura packages the exact approved local snapshot—including eligible uncommitted edits—into an isolated validation branch; it never asks Unity to validate an older base commit. - Create a dedicated build configuration. In Unity Cloud, open the correct organization and project, then open DevOps → Build Automation → Configurations. Connect the repository and create a configuration named Aura Validation. Select the repository branch, Unity project subfolder, target platform, and the same Unity version shown in
ProjectVersion.txt. Disable automatic source-control builds so one Aura request does not create a duplicate build. - Create limited access. Create a dedicated Unity service account with only the project-level access needed to read and run the selected Build Automation configuration. Create its supported long-lived bearer token. Never enter a Unity password, payment method, organization-owner credential, or signing secret into Aura.
- Set Unity's spending boundary. In Unity Build Automation, open Settings → Build Consumption, review the organization's current included allocation, and set the spending cap you are comfortable with. Aura cannot create, raise, or bypass this cap. Check Unity's current consumption documentation because allocation and pricing can change.
- Connect Aura. In Aura, choose the Unity project, then open Settings → Cloud → Unity Cloud Connection. Enter the Unity organization ID, Unity project ID, the Aura Validation configuration ID, and the dedicated service-account token. Select Save Connection. Connect the matching GitHub repository when prompted in the Dashboard. Aura encrypts credentials in tenant-scoped secret storage and never displays them again.
- Check access safely. Select Check Connection. A successful check confirms access to the selected configuration and says No build was started. If it fails, verify the three IDs, token status, project-level role, and configuration access. Do not paste the token into a support ticket.
- Choose the execution location. Start the Loop from the same Aura chat. Leave Continue when this device is off unchecked for local execution. Enable it for an Aura Pro Cloud Loop. If Unity validation is unavailable or has not been explicitly authorized, Aura returns a reviewable change bundle labeled Unity validation pending; it must not claim the project compiled, imported, tested, or built.
If you do not have Unity Build Automation, keep the Loop local or accept a cloud-edited change bundle marked Unity validation pending and validate it after reopening the project locally. Aura never requires you to buy or enable a Unity subscription merely to connect your Aura account.
Scene Actions
When you approve supported scene actions, Aura can execute the following work directly in your scene. All actions are registered with Unity's Undo system — Ctrl+Z works on everything Aura does.
| Category | Actions |
|---|---|
| GameObjects | Create primitives, empty objects, prefab instances, lights, cameras, particle systems; duplicate; rename; delete; set active |
| UI | Create Canvas, panels, Text (TextMeshPro), Buttons, and Images with correct parenting and RectTransform setup |
| Components | Add any component by type name; add Rigidbody, Collider, AudioSource, Animator; set and wire component fields and references |
| Transform | Set position, rotation, scale; parent objects in the hierarchy; set tag and layer |
| Assets | Create materials and physics materials; apply materials; save scene objects as prefabs; create ScriptableObjects |
| Files & Folders | Create asset folders; move and delete files; trigger AssetDatabase refresh |
Vision Tool
The Vision Tool lets Aura see your Scene View. A Loop can use it between steps to verify work, and you can also attach a view manually.
- Click the 👁 button in the input bar to capture the current Scene View and attach it to your next message.
- Click 📷 to attach any image from disk — useful for reference screenshots or mockups.
- After Aura executes scene actions, the panel automatically captures and attaches the result so Aura can verify its own work.
@ File Mentions
Attach any script or asset as direct context for a single message. This gives Aura the full file content — not just the architecture summary — which is useful when asking about a specific implementation.
- Click @ in the input bar, or type
@in the text field. - A fuzzy-search dropdown appears. Type any part of the filename.
- Select the file — it is attached to your next message only.
Use the attachment and project controls in the composer when a file or folder should be included explicitly. The active project remains the default scope for the conversation.
Project Context
Select a project from the left sidebar so Aura can use its engine, indexed files, connected editor state, GDD, and prior project conversation context. The top bar shows whether context is live and whether editor actions are ready.
Aura proposes project-changing actions for review. Architecture preferences and constraints should be stated in the conversation or maintained in the project's GDD until a dedicated instructions surface is available.
Projects & Conversations
The left sidebar lists detected or manually added projects and their conversations. One project is active for a conversation at a time, which keeps context and actions from leaking into another game.
From the sidebar you can:
- Choose an existing project or add a project folder
- Start a new conversation without losing prior project history
- Pin, rename, archive, or remove local project and conversation entries
Project Scanning
Aura scans a connected project to build local context for chat, GDD work, and reviewed actions. The top bar reports when a scan is recommended; use the project controls to refresh context after substantial external changes.
You can ask Aura to review selected files or attached folders for issues such as:
GameObject.Find()orGetComponent<>()called insideUpdate— should be cached inAwakeorStart- Transform position set in
UpdatewithoutTime.deltaTime— frame-rate dependent movement Resources.Load()— prevents asset bundle optimisation; prefer direct references- Array allocations in hot paths — GC spike risk
Debug.Log()left in production code
GDD Workspace
Use the GDD button in the top bar to open the active project's design-document workspace.
- Attach an existing PDF, DOCX, Markdown, or text design document.
- Create or update the active project's structured GDD from chat.
- Review GDD synchronization suggestions before accepting document changes.
Art Direction
Describe the look you want in ordinary language. Aura turns that request into a project-specific visual direction covering the medium, palette, value and lighting, shape language, environments, animation, effects, interface, camera, engine import, and performance constraints.
You may name a game as a quality or design-principle reference—for example, “beautiful pixel art like Sea of Stars.” Aura should use that shorthand to understand qualities such as readable silhouettes, authored color ramps, layered environments, lighting, animation richness, and interface cohesion. It should not copy another game's characters, maps, layouts, interface, or assets.
The reviewed direction stays with the project so later work remains consistent after a long conversation or restart. Aura should reuse suitable approved assets, create only what the current work genuinely lacks, and ask for approval before replacing or materially restyling existing authored work.
Review the game-design and art-direction tutorial.
GDD Indexing
To give Aura awareness of your game design document:
- Select the project, then click GDD in Aura's top bar.
- Select your GDD file (PDF, DOCX, or plain text supported).
- Aura AI indexes the document. This takes a few seconds.
- Aura can retrieve relevant GDD passages when a request needs design context.
Aura Core supports unlimited local projects and GDDs. GDD count is not a subscription gate.
Godot Integration
Installing the Plugin
The Aura Godot plugin is bundled with the Aura AI installer. On first launch, Aura AI reads your Godot
project registry and copies the plugin into each project's addons/ folder automatically.
Open Godot 4 after installing Aura AI and enable the plugin if Godot asks you to confirm it.
The Aura Dock
Once enabled, the Aura AI dock appears in the editor. From here you can:
- Type prompts and get responses in the chat area
- Use Attach current script to automatically include the active GDScript or C# file
- Choose Auto or a specific model from the shared model picker
- Review the active model-funding source without a per-response balance counter
Unreal Engine Integration
Installing the Plugin
The Aura Unreal plugin is bundled with the Aura AI installer. On first launch, Aura AI reads your Unreal
project history and copies the plugin into each project's Plugins/ folder automatically.
Open the project after installation; Unreal may ask to compile the editor plugin the first time it sees
it.
Type: "Editor" module — it is excluded from shipping builds automatically.
The public Aura AI installer is available for Windows now; macOS installer support is coming soon.
The Aura Panel
After enabling the plugin, the Aura toolbar button appears in the Unreal editor. Click it to open the Aura panel. From here you can:
- Type prompts and get context-aware responses referencing your project's C++ and Blueprint code
- Attach the active file for inline refactoring suggestions
- Choose Auto or a specific model for complex Gameplay Ability System or animation questions
- Review the active model-funding source without a per-response balance counter
IDE Extensions
Aura AI auto-installs IDE plugins when it detects a supported editor. IDE plugins are support surfaces for an existing game project: they provide file, cursor, and code-action context for the same Aura project instead of creating a separate VS Code, Visual Studio, or Rider project. You will be prompted to sign in on first launch (Google, GitHub, or email) before any features are available.
VS Code
After Hub launch, open VS Code and run Open Aura AI from the Command Palette. You can also use the Aura icon in the Activity Bar when it appears.
Use the command or Activity Bar entry to open the shared Aura panel for the current game project. Available file, selection, and editor context depends on the extension and host state.
Visual Studio
In Visual Studio 2022, open Tools → Aura AI to launch the Aura panel for the current solution.
Use the toolbar and output-pane integration to open Aura for the current solution. Review the context Aura received before relying on a file-specific answer.
JetBrains Rider
In Rider, open Tools → Open Aura AI. In the new Rider UI, use the top-left main menu,
then Tools → Open Aura AI; Search Everywhere / Actions can also find
Open Aura AI. For Unreal projects, open the actual .uproject file in
Rider so Aura receives the real Unreal project context.
Use the tool-window action to open Aura for the current project. For Unreal, opening the real
.uproject is necessary for project-aware context.
Account & Billing
How Model Funding Works
Aura resolves one explicit funding source before every model request. Software access and model usage are separate:
- Trial: 100 one-time Gemini 2.5 Flash requests; no card and no reset.
- Personal keys: OpenAI, Anthropic, or Google bills you directly. Aura never debits its wallet for a BYOK request.
- Kimi through Aura: Kimi models are Aura-managed only. They never consume the 100-request Gemini trial and become usable after the trial with prepaid Aura balance.
- Aura balance: prepaid closed-loop balance for approved Aura-hosted models, reserved before dispatch and settled from normalized provider usage at the displayed price version.
- Studio funding: organization keys or a shared organization Aura balance selected by organization policy; members never receive raw organization keys.
- Local models: no provider or Aura usage charge.
Aura never changes payers automatically. If a reviewed multi-step build needs more Trial requests than remain, Aura stops before sending anything. If Aura Balance is selected, Aura shows an exact worst-case maximum from the active price version and keeps approval disabled when the available balance cannot cover it. Calculating that maximum does not send model work, consume Trial requests, or reserve wallet funds.
Plans & Upgrades
To change your plan, open Dashboard billing. Core is available without a software subscription. Pro adds encrypted multi-device cloud and Cloud Loops; Studio adds organization administration and includes Pro for licensed members. Model usage is separate.
Billing Portal
Manage your subscription, update payment methods, or cancel via the Stripe billing portal. Access it from:
- Aura AI → Settings → Billing Details
- Your Dashboard → Billing
If a subscription renewal fails or needs bank/card confirmation, Aura emails you and pauses the affected paid cloud or Studio feature until billing is fixed. Core local features, free Personal BYOK, and existing Aura balance remain available. Use Dashboard - Billing to resolve the subscription payment.
Team Features
Team features are available on Studio, beginning at five seats with additional-seat support and no fixed team-size ceiling. Base and additional-seat pricing is shown before Studio checkout opens. Model usage is separate.
Studio Setup
Create or select a Studio workspace in the Dashboard, choose the seat count, and complete checkout. The purchasing account becomes a billing owner; only assigned, active seats receive Studio and Pro capabilities.
Inviting Members
- Open Dashboard → Studio workspace.
- Choose Invite member, enter their email address, and assign a role.
- They receive an invitation email with a link to accept.
- Once accepted, they can sign in with their Aura account (Google, GitHub, or email) and the Studio features activate.
Workspace Administration
In Dashboard → Studio workspace, authorized owners and admins can review:
- Email address
- Role (Owner / Member)
- Purchased, assigned, reserved, and available seats
- Organization wallet history and policy-safe funding state
- Anthropic, Google, and OpenAI organization-key status; owners and admins can save, rotate, or revoke keys when secure key management is active
Security & Privacy
Data Handling
When you submit a prompt:
- Aura prepares the prompt and any context you chose to include.
- The request is transmitted over TLS and Aura authorizes the selected account, project, model, and funding source.
- Aura generates the response through the configured model path. With a personal key selected, the matching provider bills you directly and Aura does not debit your balance.
- The response is returned to Hub and displayed in your editor.
- Ordinary Core requests do not create an Aura cloud project workspace. Any enabled cloud continuity or Cloud Loop storage follows the disclosed workspace and retention controls.
Local-First Design
Aura Core keeps project indexing, editor integration, Local Loops, and local project memory on your machine. Model requests transmit the prompt and context you choose to the selected provider path over TLS.
Aura Pro can synchronize encrypted history and context across trusted devices. A Cloud Loop uses an isolated Aura cloud workspace so it can continue while your computer and editor are off. Cloud execution is opt-in, is not used for training, and follows the published processing, export, and retention controls.
Private Error Reporting
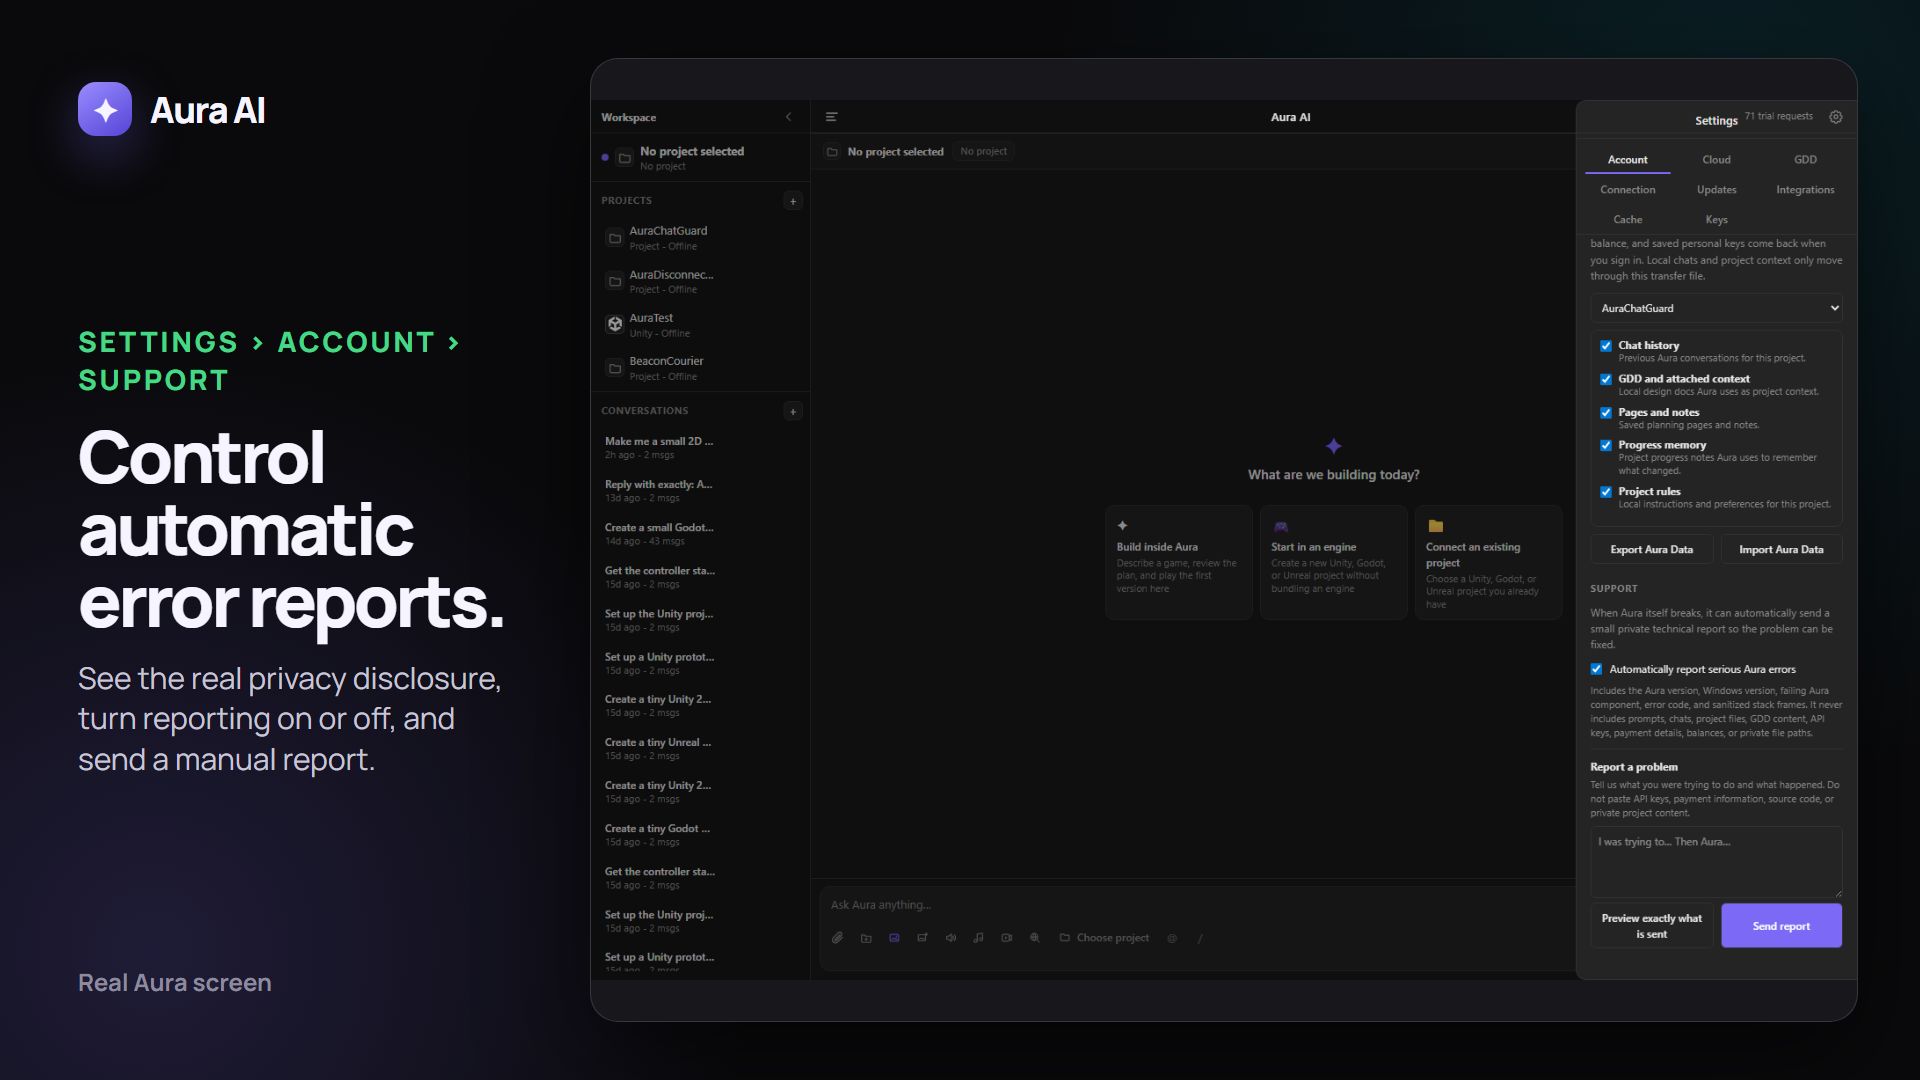
When automatic error reporting is enabled, Aura sends a bounded technical report after an Aura component fails. The report contains the Aura and operating-system versions, the failing Aura component, an error class and code, sanitized stack-frame names, and limited correlation details. It does not contain prompts, chats, project files or snippets, GDD content, API keys, credentials, payment details, balances, or absolute file paths.
Each accepted incident receives an AURA-… reference. Repeated copies are grouped, reports wait privately on the device when offline, and delivery retries after sign-in. Open Settings → Account → Support to see the latest reference, turn automatic reporting off, delete unsent automatic reports, preview a manual report, or describe a problem yourself. Manual descriptions are scrubbed for recognizable secrets and private paths before delivery.
For the full security picture, see our Security page.
Package Compatibility
Aura AI is designed to work alongside the most common third-party packages and plugins for each engine. The table below reflects packages that have been tested and confirmed to work without conflicts. If you encounter an issue with a package not listed here, open a ticket at support@aurainc.co.
Unity Packages
The Aura Unity plugin is distributed via UPM (Unity Package Manager) and operates entirely inside the Editor namespace. It does not modify any runtime assemblies, which means it coexists with runtime packages without interference.
| Package | Status | Notes |
|---|---|---|
| Photon PUN / Fusion | ✓ Compatible | No assembly conflicts. Aura can reference Photon scripts via
@mention for context-aware multiplayer assistance. |
| Odin Inspector & Serializer | ✓ Compatible | Odin's custom drawer system does not affect the Aura Editor
window. [OdinSerialize] attributes are preserved when Aura writes files. |
| Newtonsoft Json.NET (JSONConverter) | ✓ Compatible | Aura uses the Hub (Python) for its own JSON needs and does not add a competing JSON assembly to the Unity project. |
| Unity Serialization / SerializeReference | ✓ Compatible | Aura's file-write system performs plain text operations and
does not deserialize Unity assets, so [SerializeReference] hierarchies are
unaffected. |
| Hot Reload for Unity | ⚠ Partial | Hot Reload patches assemblies in-memory. When Aura writes a file, Hot Reload will re-patch automatically. If an in-flight Aura response is interrupted by a Hot Reload patch, Aura will restore the pending prompt and display a warning — simply resend. |
| TextMeshPro | ✓ Compatible | No conflicts. Aura is TMP-aware and will generate
TMP_Text references when asked about UI. |
| Unity Input System | ✓ Compatible | Aura detects whether the new Input System package is present
via your project's architecture map and generates the correct
InputAction / PlayerInput code. |
Godot Add-ons
The Aura Godot plugin runs entirely as an @tool script in the editor and has no impact on
exported builds.
| Add-on | Status | Notes |
|---|---|---|
| Nakama (Heroic Labs) | ✓ Compatible | No conflicts. @mention Nakama scripts for
context-aware online feature help. |
| Phantom Camera | ✓ Compatible | Works alongside Aura without conflicts. |
| GodotSteam | ✓ Compatible | GodotSteam replaces the engine binary. Aura's plugin targets only the editor API and is unaffected. |
| Dialogic | ✓ Compatible | Aura can read and generate Dialogic timeline scripts via
@mention. |
Unreal Engine Plugins
The Aura Unreal plugin is a standard Editor-only module (Type: "Editor" in
.uplugin). It is excluded from shipping builds automatically.
| Plugin | Status | Notes |
|---|---|---|
| Gameplay Ability System (GAS) | ✓ Compatible | No conflicts. Aura is GAS-aware and generates correct
UGameplayAbility / UAttributeSet boilerplate when asked. |
| Advanced Locomotion System (ALS) | ✓ Compatible | ALS is Blueprint-heavy. Use @mention on ALS
C++ headers for context-aware assistance. |
| Playfab / Photon Quantum | ✓ Compatible | Backend SDK modules are runtime-only and do not interact with the Aura editor module. |
| MetaHuman | ✓ Compatible | MetaHuman assets are data-only. No conflicts. |
| Rider / UnrealLink | ✓ Compatible | Aura and UnrealLink both operate as separate editor modules. Running both simultaneously is supported. |
Troubleshooting
Hub Not Connecting
If your editor plugin shows "Cannot connect to Aura AI":
- Make sure Aura AI is running in your system tray.
- Restart Aura AI, then reopen your engine or IDE.
- Check that Windows Firewall is not blocking Aura AI local connections.
- If it still cannot connect, open Aura AI → Settings → Account → Support. Copy the latest
AURA-…reference if Aura already reported the failure, or describe the problem and send a manual report.
Plugin Not Loading
If an editor plugin was not auto-installed:
- Restart Aura AI, then reopen the editor.
- Confirm the project has been opened at least once on this PC so Aura AI can detect it.
- For Unreal, open the actual
.uprojectfile so Aura can identify the project. - If the plugin still does not appear, open Aura AI → Settings → Account → Support. Copy the latest
AURA-…reference if Aura already reported the failure, or describe the problem and send a manual report.
Aura Balance Not Updating
If your Aura balance does not reflect a recent deposit:
- Wait up to 60 seconds — the Stripe webhook may take a moment to process.
- Refresh Dashboard → Model funding and review the wallet history entry.
- If the issue persists after 5 minutes, contact support@aurainc.co with your receipt.